A few months ago, I was looking for a media server for all my movies, TV shows and music. I needed something to stream content over wifi to my Chromecast or smart TV. While there are many devices in the market for just that like NVIDIA SHIELD, or NAS storage with streaming capability, or gaming stations like X-Box or Playstation, all of them come with a price tag. All of these new generation media servers also provide up to 4K playback. But my needs are simple – up to 1080p playback, support for local content, expandable memory, small size, low noise, low power consumption – so that it can be kept always on and low price.
One option was to build a PC from components. The right choice of components like older generation processors and micro ATX motherboards would be a good choice, but it’s still not very small or power efficient. Another option is to use something like Intel NUC. Which may be a good way to go, however, at the time, availability in my area was not so good. And Intel NUC had only a few models available and none in my price range to “try out and see”. So I decided to try and use my Raspberry Pi 3, Model B – which turned out to be just the right fit for my needs. So here is write up my experience, which will help you to setup your own.
Hardware
Raspberry Pi 3 Model B, 2.1 A micro USB Power supply, 8 GB Class 10 microSD card and reader, 60 mm 5 V cooling fan*, Raspberry Pi 3 case, Ethernet cable, USB hard disk, and wifi router with one free Ethernet port (duh!) and of course a PC to access Raspberry Pi over SSH to configure it.
* I started the project with parts that I had - that's a Raspberry Pi 3 and official case. I added the fan later as I found the need. 60 mm fan sits nicely on top of the case with the top cover removed. You may wish to purchase a case with fan pre-installed. One disadvantage of this method is, the fan will be always on - which consumes power and make noise.
Software
Software requirement here is pre-requisite to set up the media server on Raspberry Pi. I'm writing these instructions for a Windows OS. Raspbian Jessie Lite, software to write OS image to SD card like Etcher or Win32 Disk Imager, an SSH client like Putty or MobaXTerm, a text editor like notepad.
For a Raspberry Pi to be used as a media server, we don't need it to have a monitor. We will be running Raspberry Pi in headless mode. So the Lite image is the best option as it consumes less memory space and RAM. I used Plex for as media server, as it supports virtually all file formats and transcodes media on the fly. Installation of Plex will be done on Raspberry Pi directly over SSH, so there is nothing to download. There are other options like KODI.
Process
If you have a working Raspberry Pi set up with Raspbian Jessie Lite, and know how to SSH into the Raspberry Pi, skip to step 7
1. Install Raspbian Jessie Lite, and write it to a microSD card. Follow the steps as given on official Raspberry Pi site.
2. Enable SSH. For this, navigate to the SD card "boot" folder. It's accessible on a Windows OS as well. Using notepad, create an empty file named "ssh". Make sure it does not have any extension like .txt. These instructions are given in Option 3 on the official site.
3. At this point, insert the microSD card in the Raspberry Pi, connect it to a port on wifi router and power it up. Fan can be connected to the Raspberry Pi anytime before starting to use it as media server. 5 V fan is ideal, as it can be directly powered with the USB supply by tapping it to pin outs.
4. In order to gain access to the Raspberry Pi, we need to know its IP address. There are multiple tricks to do that. The simplest method, which I like is to log in to the wifi router's utility page and look for connected devices. The instructions for this will depend on wifi router. It's usually located in administrative options. Another method is "arp -a" command on Windows. It will show up all connected devices. You will have to take a guess or use trial and error to find the address of Raspberry Pi if more than two devices are shown.
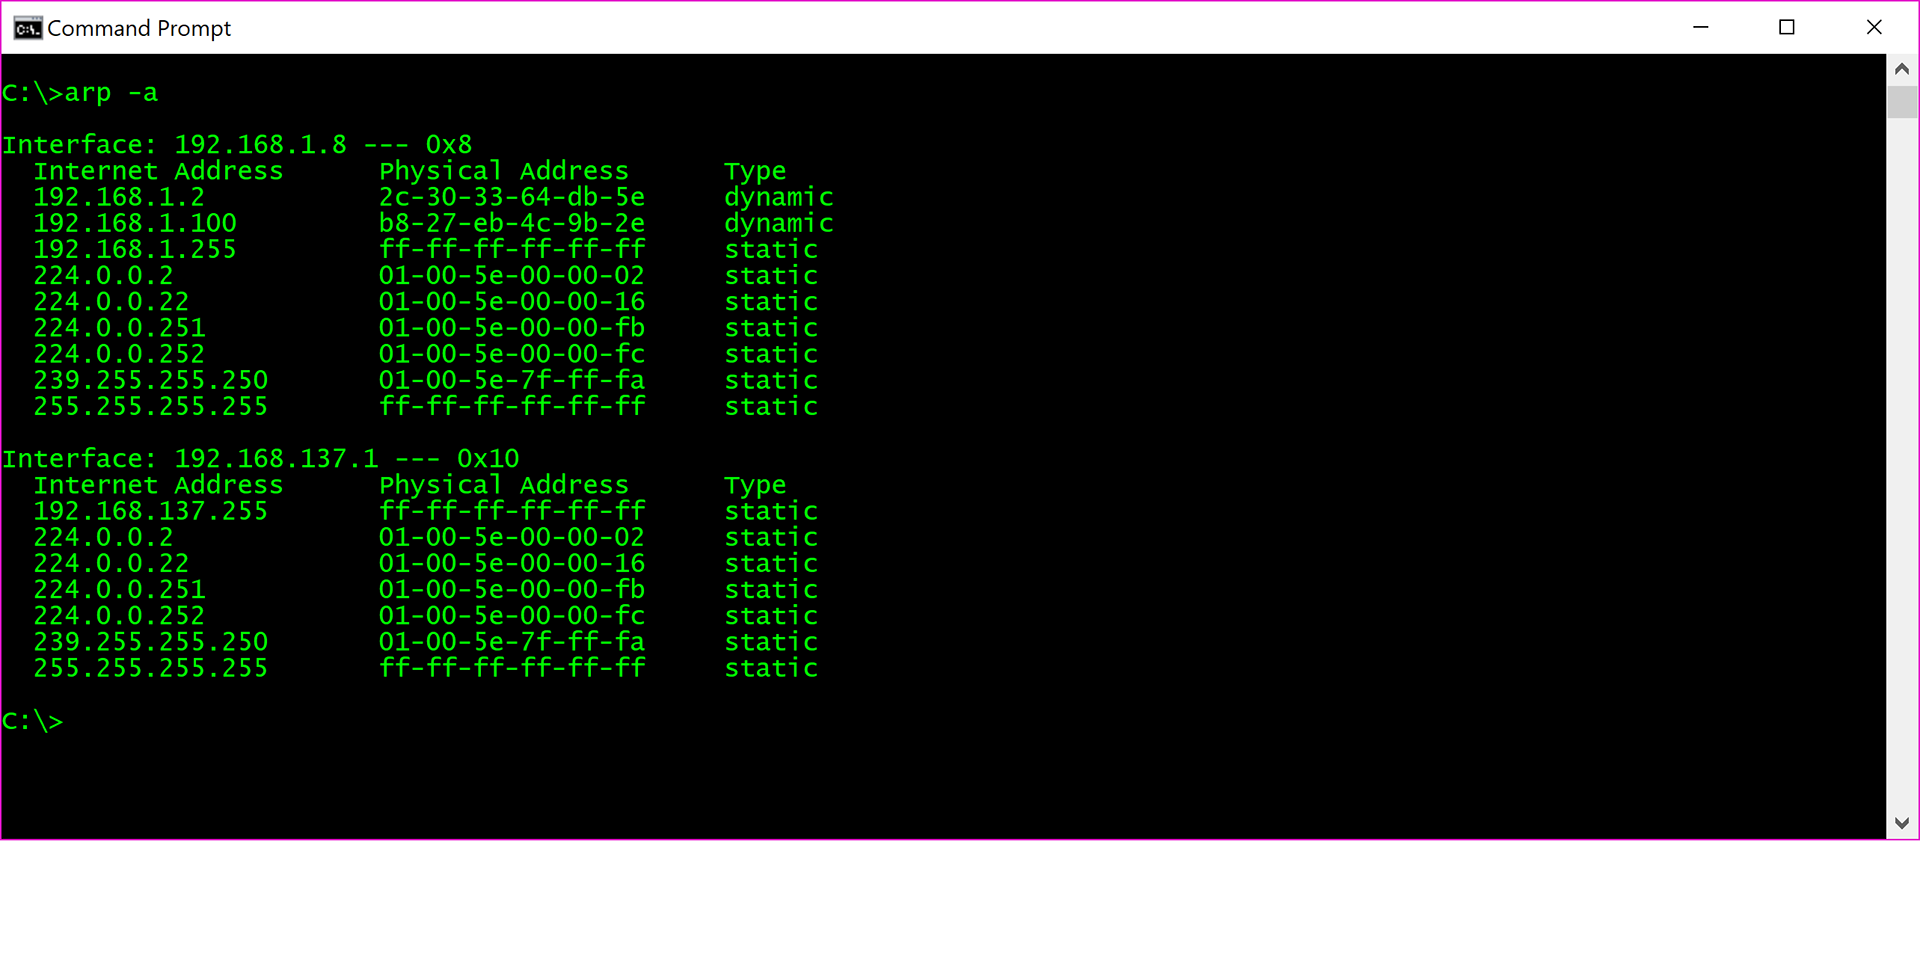
In above image, 192.168.1.8 is IP address of my computer, 192.168.1.2 is IP address of my wifi router and 192.168.1.100 is IP address of the Raspberry Pi. If there was one more address of dynamic type, we would need to use trial and error method to identify the Raspberry Pi. More method(s) to identify the IP address of a Raspberry Pi is provided here.
5. Login to the Raspberry Pi using SSH. Instructions are provided here.
6. For first time boot, it's a good idea to do certain things. For that, enter command
sudo raspi-config
This will pop up a screen with a menu. Things that need to be set here are - Change User Password from the main menu (always a good idea). Then navigate to "Advanced Options" and Select "Expand Filesystem", to ensure all of the microSD card is available for storage. Note that raspi-config dialog is changing and is different with different versions. So options may be relocated in a different place in your setup. The system will reboot after exiting from raspi-config. Login again with the new password to continue.
7. At this point update the Raspberry Pi software using following commands.
sudo apt-get dist-upgrade
sudo apt-get update
sudo apt-get upgrade -y
8. Now if a USB drive was connected to the Raspberry Pi, it should get detected and mounted automatically. In order to setup automount of USB drive on system reboot, follow this article by Gus from PiMyLifeUp. This USB drive will be storage for all your media, thus it can be of virtually any size you need. In his tutorial, Gus has mounted external USB drive to /media/usb1 path. Meaning entire of USB hard disk contents will be available from this path. If you have more than one partition on USB hard disk, each will need to be mounted separately. All folders will need to be accessed using this path. For example, you will have a folder each for movies, music, and tvshows and access it as /media/usb1/movies etc. The only time you will need this information again, is to set up Plex Media Server library, using its (graphical) web page.
9. Install Plex Media Server. Gus has also written a good article on how to. Access it here. In this article, Gus has also mentioned how to assign a static IP address to the Raspberry Pi so that each time Raspberry Pi and hence the Plex Media Server will start with the same IP. My preferred method to assign static IP is using wifi router's DHCP setting. This way you will be able to control all static address assignments from one portal. The only thing you should need to change from the article is the actual path where the media is saved - or will be saved. I disabled DLNA from Plex settings, as I was not going to use it.
10. Enable overclocking. In my experience, enabling overclocking slightly gives the Raspberry Pi just enough juice for smooth playback. Doing this is easy, but also will void your warranty. Be careful with this settings, and only enable them if the cooling fan is connected and running. Overclocking may result in Raspberry Pi crashes. If that happens, reduce the overclocking frequencies (ARM and SDRAM).
sudo nano /boot/config.txt
Edit the file to add following lines
over_voltage=6
# arm_freq default is 1200
arm_freq=1350
arm_freq=1350
#sdram default is 400
sdram_freq=500
sdram_freq=500
Use ctrl + o to save and ctrl + x to exit.
sudo reboot
Experience
Plex is a great software which manages content, downloads metadata like posters, synopsis, subtitles, and theme music automatically. It also keeps track of watched items and location in a file. It also arranges and automatically clubs content of TV shows by seasons. It's been a breeze using Plex as my media hub. The best thing about Plex is it's available for virtually all platforms and devices.
As I told earlier, my target was up to 1080p media. Most of my media are 720p. I used Plex web app on my computer and used Plex to stream media to TV over Chromecast. Both of these only required audio to be transcoded from AC3 to AAC. Plex does it automatically during playback as needed. The video content is directly played without conversion. This means Raspberry Pi is not required for video transcoding, which is a computation intensive task and is probably not possible at playback time.
Most media played smoothly without any interruptions. Some media playback was choppy with "Server is not powerful enough" message. In all cases (so far) this got away by selecting "Optimize..." option in the media library for respective media. I used the setting of "Optimize for TV" from the drop down. Picture quality is good - at least for my eyes. I do not have a 5.1 channel speaker system, so I am not able to comment on surround sound quality.
During playback, ARM chip really heats up, so forced cooling is a must. With my setup, I automated fan to run when ARM temperature goes above 55 deg C and switch it off when the temperature goes below 50 degrees using a simple Python script. You can read about it here. This results in intermittent operation of the fan, keeps fan off most of the day when I'm not watching anything. Also on cooling - Stay away from the cheap aluminum heatsinks that are sold with many Raspberry Pi cases. They don't do anything. Blowing fan directly on the board helped cool down everything.
I did not measure the actual power consumption of the system, however, from various measurements posted by users online, power consumption when the Raspberry Pi is idle is 250 mW, that's just a quarter of a watt. Even during stress/playback, this will be under 5 Watts.
For my setup, I used USB hard disk, microSD card, Ethernet cable that I already had. Raspberry Pi 3 Model B costs $35, fan cost was $10, and power supply cost was $5. Even when buying everything new, the whole setup should be under $100 with 1 TB USB drive (not including wifi router, TV, and Chromecast of course). All of the softwares used are free.
Raspberry Pi and the logo is a trademark of the Raspberry Pi Foundation
Plex, the Plex Play logo, and Plex Media Server are trademarks of Plex and used under a license